Follow our step by step tutorial to configure Outlook 2000 / 2002. Instructions are virtually identical for subsequent releases of Outlook.
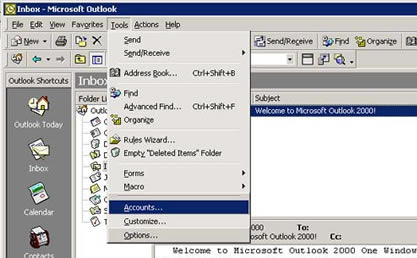
Step 1: Open up the Accounts window
Click on "Tools" in the top menu, then "Accounts". A window called "Internet Accounts" will appear.
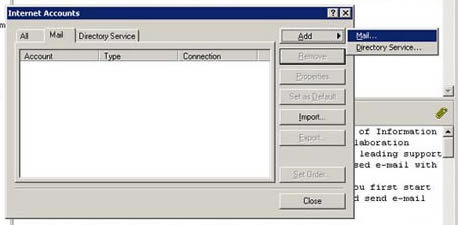
Step 2: Choose to administer your Mail settings
Select "Add" and then click "Mail".
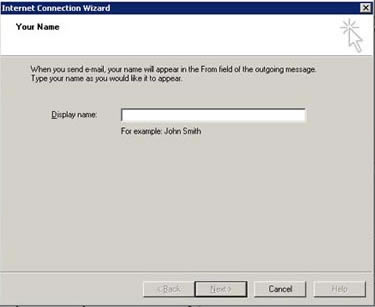
Step 3: Set up your name
Insert your name, or your business name, depending on the purpose of this e-mail account. e.g. 'John Smith', or 'My Business'
Once entered, click "Next".
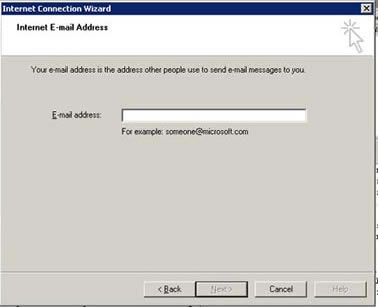
Step 4: Define your Reply Email Address
Enter your e-mail address in this field.
Click "Next", when done.
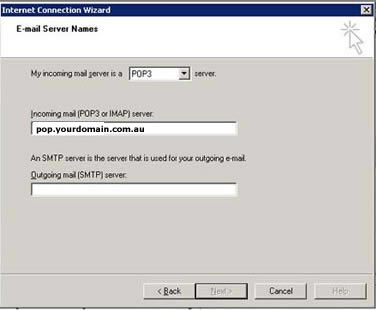
Step 5: Define your mail servers
Enter the following information:
- Your incoming mail server is a POP3 server
- The incoming mail server is your domain name with a "pop" prefix, for example if your domain is yourdomain.com.au, then enter: pop.yourdomain.com.au
- The Outgoing mail (SMTP) server is defined by your ISP (Internet Service Provider).
e.g. if you are connected to the Internet with Telstra Bigpond, the server will be mail.bigpond.com. Your ISP will be able to give you details of the outgoing mail server.
Once you have entered all the server details, click "Next".
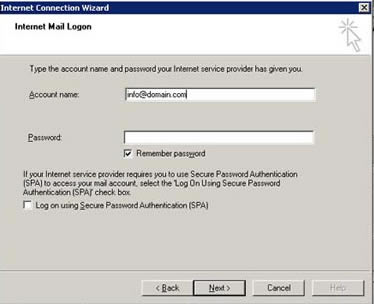
Step 6: Define your email address
In the field called "Account Name" replace 'info@domain.com' with the full e-mail address provided to you.
The "Password" field should contain the password that you were provided for the email address you are entering.
Tick the "Remember password" box, if you do not wish to re-enter the password each time you check your mail.
Make sure that "Log on using Secure Password Authentication (SPA)" box is NOT ticked.
Once this is completed, click "Next".
Step 7: Setup complete. Run a test.
Simply click "Finish" on the next page.
We recommend you perform a test to confirm your configuration and settings. You can try sending a message to check that the Outgoing mail server provided by your ISP is working correctly. If it does not, an error message will pop up, where you will be asked to check the account settings. Follow the instructions and make sure that you have not mistyped anything during the setup.
Another common problem is if you mistype the password during setup. In this case, a box will pop up with the account name and password, asking you to re-enter them. Simply re-type the password as you remember it and try again.
If you require assistance, please submit an enquiry or call 1300 667 036.
|